Showing posts with label IIS. Show all posts

Tuesday, April 3, 2018

Attaching debugger to IIS process in Visual Studio

Intro

The developer needs to debug web application. The web application is running on IIS.

Attach to process

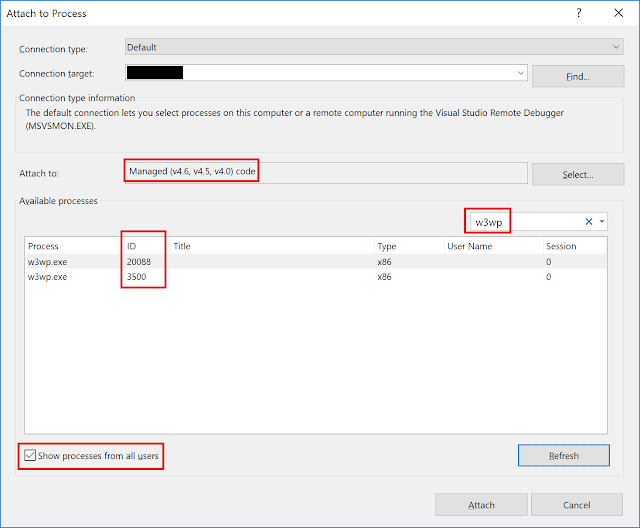
Open your project in Visual Studio and build it. Then go to Debug → Attach to Process (Ctrl + Alt + P).  See picture below.

Attaching to IIS process in Visual Studio
Attaching to IIS process in Visual Studio

In 'Attach to' section select appropriate code type if you know it, otherwise you can keep it as default 'Automatically determine the type of code to debug'. In such case, the appropriate debugger will be selected based on the kind of code that is running.

To make sure that 'Available processes' windows shows your IIS process, check 'Show processes from all users' checkbox. Then use the filter to find all aspnet_wp.exe, w3p.exe, or w3wp.exe processes. 

Multiple w3wp processes

Which w3wp.exe PID corresponds to which application pool? This is the question you will face if you have multiple web applications running on your machine.

In IIS7+ and Windows 2008+, you can use appcmd.exe utility to determine which PID belongs to which IIS process. Open command prompt as Administrator → navigate to %windir%\system32\inetsrv\ → run following command:

cd/d %windir%\system32\inetsrv\

appcmd list wp

The output of the command will show which PID belongs to which IIS process. See picture below.
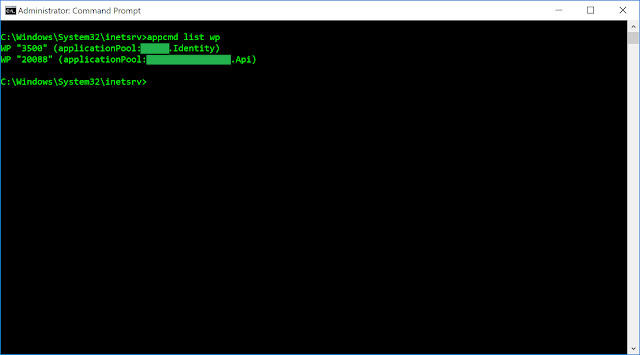
The output of appcmd utility execution

Please read the following article to learn more about AppCmd: Getting Started with AppCmd.exe
Monday, March 5, 2018

Installing Jenkins on Windows with IIS. HTTPS configuration.

This post gives you an overview how to install Jenkins on Windows using IIS and reverse proxy.

Jenkins installation

Jenkins installation is pretty simple. Go to https://jenkins.io/, download the latest version of Jenkins for Windows and install it.
By default, Jenkins will be available on 8080 port. Open your browser and navigate to http://localhost:8080. It is the address where Jenkins is running.

Setting up IIS

To setup reverse proxy you need to install the following IIS plugins:
Click on links above and you will be navigated to official installation source for both IIS plugins.

Reverse proxy for Jenkins

First of all, we need to create a new website. Create a new one with the name 'Jenkins'. After installation of IIS plugins, you should be able to configure a reverse proxy.

Follow the instructions from https://wiki.jenkins.io/display/JENKINS/Running+Jenkins+behind+IIS to setup HTTPS to HTTP reverse proxy for Jenkins.

HTTPS configuration

We will use Let’s Encrypt for certificate generation. Let’s Encrypt is a free, automated, and open Certificate Authority. And Certify tool to manage certificates.
  1. Download from https://certifytheweb.com/ and install it.
  2. Click 'New Certificate', choose your IIS site (which must have 1 or more hostname bindings set). Save your settings and click 'Request Certificate'
  3. All done! Click 'Configure Auto Renew' to set up the scheduled task for renewals.

Conclusion

Now we have a basic setup for Jenkins on IIS with HTTPS support.